Facebook

Showing posts with label DIY. Show all posts

Tuesday, September 23, 2014

DIy Whimsical Witches Headband

Simple Whimsical Witches Headband

Halloween! Halloween! Halloween!! It's just around the corner! Did I mention that I love Halloween? With that being said I am doing my first DIY 2014 Halloween project. 

So have fun with it. The skies the limit!

Materials you’ll need

Witches hat
Headband or hair clip
Flowers
Halloween ribbon
Glue Gun
Glue sticks
Halloween Owl 
Scissors
Embellishments


Begin by measuring the ribbon around the witches hat and cut what you need. Hot glue one end of the edge of the ribbon and stick it to the witches hat. Wrap ribbon around the base and hot glue the opposite end to the hat.

Secondly, begin to apply hot glue to the back of your flowers and glue it directly on to the witches hat.

Next step is to glue on your Halloween owl. Make sure there is enough glue on it.

Final step is to add the head band or hair clip. Add hot glue on directly to the hat. Not on the headband. Place it any where on the headband and wa-lah!

Saturday, February 9, 2013

DIY Prayer Pouch


I've always had this thing about pouches and Scapulars.


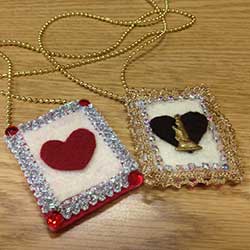
 Although two very different things, I found them to be very whimsical and personal. So one day I came up with an idea to introduce the two and make them into one. The Prayer Pouch was born. The is a unique pouch that you'll wear around your neck. But theirs something special about this pouch. On a piece of paper write down your prayer or wish. Insert it into the pouch and wear it.
Here's a tutorial I made for Valentine's Day for www.mamiverse.com. The below tutorial was made specifically for Valentines Day. You can make one for any occasion. I hope you enjoy it...
Valentine's Day POUCH NECKLACEValentine’s DIY Crafts: Magic Heart Wand & Candy Pouch Necklace
Materials
Pink or red felt
Embellishments (buttons, rhinestones, sequins, glitter, etc)
Craft glue
Ribbon
Faux leather cord for necklace
Scissors
Instructions
1. Cut two identically-sized squares of felt, as big or small as you would like to wear.
2. Glue the two sides and bottom of the pouch. Do not glue all four sides because you won’t be able to open the pouch to fill it with candy.
3. Now embellish one side of the pouch. The side that you embellish will be the front of the pouch. Use heart-shaped rhinestones, ribbon, glitter, buttons, jewels. Be creative!
4. Take the faux leather cord and make a slip knot at one end. Then glue the opposite ends to the inside edges of the pouch. Let dry for 30 minutes.
Now your pouch is ready to wear!

Thursday, February 7, 2013

DIY Valentine's Day Wand Tutorial


Every year, our kids celebrate Valentine’s Day with cute little cards and candy. Why not have them spread extra love with these sweet, colorful projects that you can do together. Your kids will feel extra special on Valentine’s Day when they wear one of these cute little candy pouches or wave the magic wand they made all by themselves—with a little help from you, of course. Suitable for ages 5 and up.


MAGIC HEART WAND
Materials
Wooden dowel
Pink or red felt
Embellishments (buttons, rhinestones, sequins, glitter, etc)
Craft glue
Hot glue gun
Cotton balls or pillow stuffing
Ribbon
Scissors
Instructions
1. Begin by cutting 2 medium heart-shaped pieces from the felt. Make sure both hearts are about the same size.
2. Carefully hot glue the edges of the heart pieces together, leaving 1 to 2 inches at the bottom open so that you can stuff it.
3. Have your little one stick the cotton balls into the felt heart. Make sure it’s nice and puffy. (Use the stick to push the cotton in.)
4. Insert the stick about 2 inches into the felt heart and add hot glue to seal the bottom and around the dowel.
5. Using craft glue, have your child decorate the heart with all the embellishments she wants. The more bling, the better!
6. Let your child tie long ribbons around the stick at the base of the heart.
7. Set aside so the embellishments dry.
Once dry, your little one is ready to go spread the love with Cupid’s wand!